Working with documents
Creating documents
New documents are created in the Quark Publishing Platform Client workspace. To create a new document, click New and choose Smart Document from Server Template, Smart Section or Smart Document from the drop-down menu. Quark Author Web Edition launches and the new document displays.
Editing documents
Existing documents are opened in the Quark Publishing Platform Client workspace. To open an existing document for editing, navigate to the repository folder containing the document to be edited. Right + click the document and choose Check Out. Quark Author launches and the selected document displays.
Document sections
Use the Smart Document pane to build the structure of the document by adding and nesting the document sections. Each document section consists of a Title and Contents.
The user can select to show or hide the Add Section option in the Smart Document pane. By default, the Add Section option is shown for new documents and hidden for checked out documents.
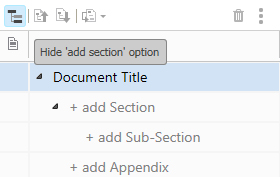
To add a section or sub-section, click + add Section, or + add Sub-Section, enter the title name and add your content.
Continue adding sections and sub-sections until you have built the document structure you desire.
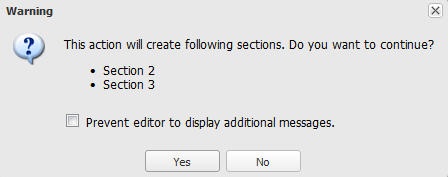
If you attempt to add a Sub-Section before you have a Section, the editor will automatically offer to create the missing sections for you:
Many of these controls are also presented in a context menu when you right-click a section in the tree.
Reorganizing the document
Edit the structure of the document in the following ways:
-
Move sections to a different location in the document by dragging and dropping them into the desired location.
-
Use the
 Promote button to promote the currently selected section of the document.
-
Use the
 Demote button to demote the currently selected section of the document.
-
Use the
 Convert To button to change the semantic type of the selected section.
-
Use the
 Delete button to delete the currently selected component from the document.
Use the  Options button to display a drop-down menu of options available for the currently selected
section of the document.
Options button to display a drop-down menu of options available for the currently selected
section of the document.

Promoting Sections
The Promote feature allows you to promote a section of your document to a higher level. The content of the section remains unchanged, only the type and level change.
If you promote a section that has sub-sections, these sub-sections are also promoted. For example, promoting Part 1:

You cannot promote a section that is at the highest level of your content model. In this case the Promote button will be unavailable.
Demoting Sections
The Demote feature allows you to demote sections of your document to a lower level. The demoted section will be converted to a sub-section of the previous section. The content of the section remains unchanged, only the type and level change.
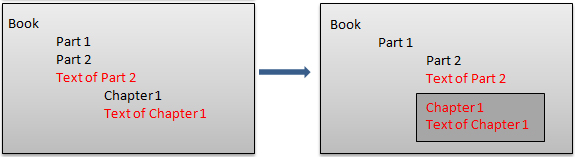
If you demote a section that has sub-sections, these sub-sections are also demoted. For example, demoting Part 2 to a chapter changes Chapter 1 into a section:

If you demote a section to the lowest level of your content model and it contains sub-sections, the content of these sub-sections will change to regions. These generic regions appear in the Para Styles drop-down menu with the new type Region.
To reverse the process, you can use Undo to return to the original structure. Regions may not be promoted.
You cannot demote a section that is already at the lowest level of your content model. In this case the Demote button will be unavailable.
Converting Sections
The Convert To feature allows you to change section types from one to another. Selecting Convert To will display a drop-down list of the allowed types available for the currently selected section.
Similar to demote, converting a section which includes sub-sections to another type can produce a situation where the sub-sections have no equivalent structure. In such cases, your content is preserved in the generic region type called Region. Any content contained in the section will be maintained if the target structure does not match the source structure. You can use Undo to reverse the process, if needed.
The system adheres to the following rules when converting sections:
-
Preserve the existing hierarchy after the conversion.
-
Only allow conversion to valid section types at the same level.
-
Do not move content around.
-
Do not allow conversion of single, required sections.
-
Do not allow conversion of referenced sections.
If converting a section will violate one of these rules, the Convert To option will not appear on the context menu and the Convert To button will appear grayed out. The list of allowed types that the currently selected section can be converted to will be restricted to those types that will not violate any of these rules.
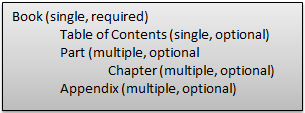
Given the following content model:
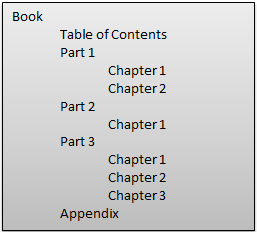
and the following hierarchy:
the rules prevent the following conversions:
-
Conversion of Part 1 to a Chapter type as this would violate the second rule allowing conversion only between types at the same level.
-
Conversion of Part 1 to an Appendix type as this would violate the third rule about moving content. If you want to convert Part 1 to the Appendix type, you would first need to move that section to the end of the series of parts, immediately preceding the existing Appendix section.
-
Any conversion of Book as this would violate the fourth rule of not allowing conversions of single, required sections.
If you convert a section that has sub-sections, these sub-sections will also be converted, maintaining the hierarchy.
If you convert a section that contains sub-sections to a type that does not allow sub-sections, the content of these sub-sections become regions. These generic regions appear in the Para Styles drop-down menu with the new type Region.
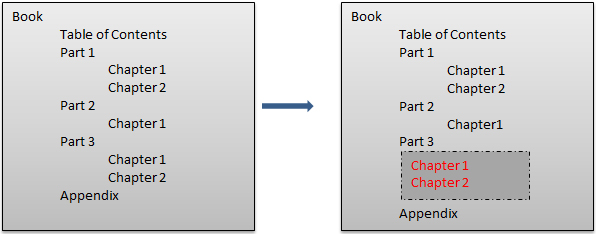
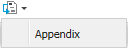
In this example, Part 3, containing sub-sections Chapter 1 and Chapter 2, was converted to the Appendix type, which does not allow for subsections. You can use Undo to reverse the process, if needed.
You may not use Convert To on a referenced section type. That's because you first need to check out the referenced component, just like you do if you want to edit the text.
Components
The Components feature provides support for content reuse by allowing you to create reusable components from existing content and easily insert them into any number of documents.
Creating a component
To create a component:
-
In the Smart Document pane, right-click on the section you want to make into a reusable component.

-
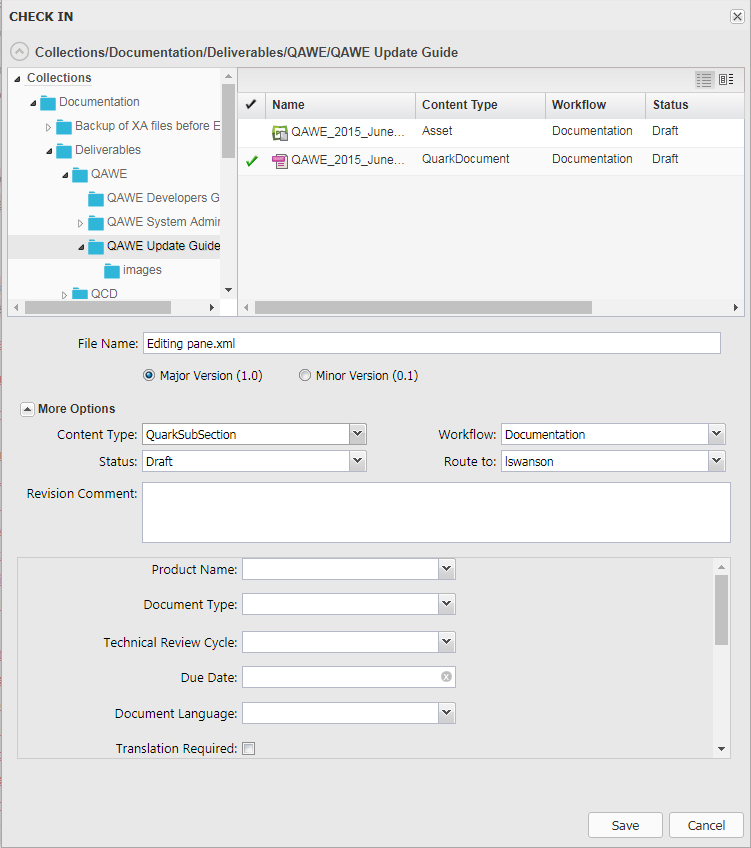
Choose Create Component from the context menu. The CHECK IN dialog box displays.
-
Specify a file name and location for the component.
-
Fill out the remaining fields with the appropriate data and click Save.
The content will be saved as a separate .xml file in the specified location. Any content in sub-sections of the selected section will be included. You now have a reusable component that you can include in other smart documents by using the Create from Server or Replace from Server context menu options.
Inserting a component
To insert a previously saved component into your smart document:
-
If the component will be an entirely new section:
-
Show the Add Section option in the Smart Document pane.
-
Right click on the + add Section where you want to place the component and choose Create from Server. The Select dialog box displays.
-
Search or Navigate to locate the component.
-
Select the component and click OK.
-
-
If the component will replace an existing section:
-
Right-click the section to replace and choose Replace from Server. The Select dialog box displays.
-
Search or Navigate to locate the component.
-
Select the component and click OK.
-
Editing a component
To edit source content in a component, the component must be open for editing. The Smart Document pane uses two icons to indicate editing status for a component:
-
 - A checkmark indicates the component is checked out and available to edit.
-
 - A component icon indicates the section is a component and is not available for
editing.
- A component icon indicates the section is a component and is not available for
editing.
If the component is not open for editing, right-click on the component and choose Edit from the context menu. You will now be allowed to edit the content.
When you have finished editing, right-click on the component and choose:
-
Save to save your changes and leave the component open for editing.
-
Save and Close to save the changes and lock the component from editing.
-
Discard Changes to discard any changes and return the component to its last saved state.
Tables and Regions can also be saved as components. See "Content components".
Entering text
Use the Editing pane to add content to the document.
As you type, the text, all formatting applied using the toolbar buttons as well as all inserted media appear immediately in the Editing pane. If the document contents span beyond the limits of the editing area, a standard scroll bar will appear.
The edited text looks as similar as possible to the results end users will see after the document gets published. When you format your text using the editor features, the formatting can be immediately seen in the Editing pane.

Track changes
This feature enables multiple people to collaborate on a document. Approved reviewers across the organization may directly provide comments, deletions, and insertions.
During the review process, each user's changes are visually tracked and may be accepted or rejected. While collaborating on a document, color helps associate comments and changes entered by different users. Each user's comments and insertions have a different color which appears as the background color in the Editing pane as well as in the Changes tab on the Right pane. The color palette is configurable.
To track changes in your document, click the  Tracking toolbar button on the REVIEW tab. Use the
  Highlighting toolbar button on the REVIEW tab to enable or disable highlighting of tracked changes.
If you enable/disable highlighting and tracking in your document, the latest highlighting and tracking state will be saved along with the document.
You can see a list off all tracked changes in the CHANGES tab.
Comments and tracked text preview
Use the CHANGES tab on the right pane to see a list of all comments and tracked changes that have been added to the current document.
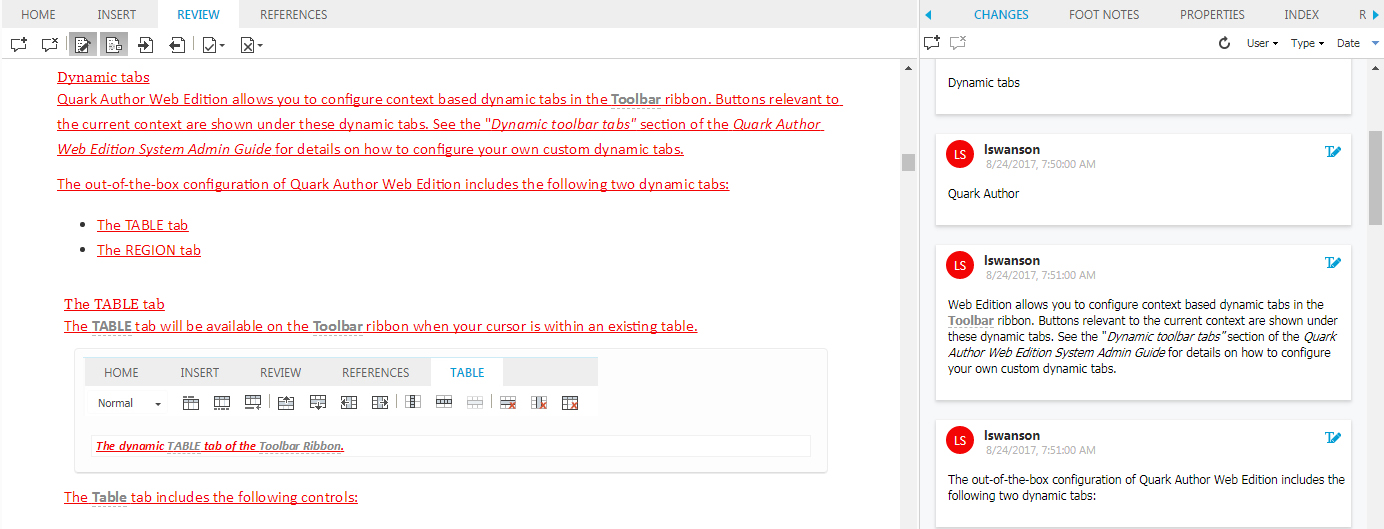
Comments and tracked changes in the Editing pane are immediately reflected in the CHANGES tab. Clicking into or selecting a tracked change or comment on the editing canvas highlights that comment or tracked change in the CHANGES tab.
If another user has a document checked out for commenting or review and you have the
same document open as read-only, you can click the Refresh  button on the CHANGES tab to refresh the list with any changes that may have been added or updated.
-
 - Use the Add Comment toolbar button to insert a comment on selected document content.
-
 - Use the Delete Comment toolbar button to delete the currently selected comment.
-
- Use the Refresh toolbar button to see recent comments or tracked changes.
-
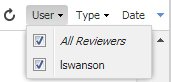
 - Use the User toolbar button to filter by specific users.
-
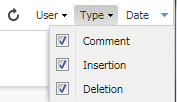
 - Use the Type toolbar button to filter by type (comments, insertions, deletions).
-
 - Use the Position toolbar button to sort the list by position in the authoring canvas in ascending
or descending order.
- Use the Position toolbar button to sort the list by position in the authoring canvas in ascending
or descending order.
-
 - Use the Date toolbar button to sort the list by Date in ascending or descending order.
Document specific tracking state
Tracking and highlighting are enabled based on a document's last saved tracking state.
The value of the tracking state will be displayed when you check in a document:

States for tracking will be saved as one of the following values of the Tracking State attribute.
-
Disabled
-
Highlighting Only
-
Tracking And Highlighting
-
Tracking Only
Navigating in the document
Use the keyboard to easily navigate within the text.
Use Page Up and Page Down to scroll the Editing Pane one page up or down in the document, no matter how many sections are in the document. Use the Home and End keys to go to the beginning and end of a line, respectively, or combined with the Ctrl key - to the beginning and end of the document. Move inside the text using the Arrow keys.
Keyboard shortcuts for Quark Author Web Edition.
|
Keyboard Command |
Action |
|
Ctrl+B |
Bold selected text |
|
Ctrl+I |
Italicize selected text |
|
Ctrl+U |
Underline Selected Text |
|
Alt+Shift + F |
Open find text dialogue box |
|
Alt+Shift + H |
Open find and Replace text dialogue box |
|
Alt+Shift + L |
Open insert hyperlink dialogue box |
|
Alt+Shift + T |
Open insert table dialogue box |
|
Alt+Shift + U |
Open bulleted list |
|
Alt+Shift + O |
Open numbered list |
|
Alt+Shift + C |
Open add comment dialogue box |
|
Alt+Shift + I |
Open insert image dialogue box |
|
Alt+Shift + K |
Open insert image from local disk dialogue box |
|
Alt+Shift + G |
Open insert figure dialogue box |
|
Alt+Shift + E |
Turn on change tracking |
|
Alt+Shift + A |
Accept changes |
|
Alt+Shift + R |
Reject changes |
|
Alt+Shift + V |
Open insert video dialogue box |
|
Alt+Shift + N |
Apply Normal Inline Style |
|
Alt+Shift+ Q |
Invoke equation editor dialogue box |
|
Ctrl+1 |
Open Para Style Combo |
|
Ctrl+2 |
Open Inline Style Combo |
|
Ctrl+S |
Save Revision |
|
Ctrl+Shift+S |
Save and Close |
|
Ctrl+Alt+Q |
Close Editor with Unsaved Changes Warnings |
|
Ctrl+Q |
Close Editor without Warning |
|
Alt+ > |
Select next tab in Right Pane |
|
Alt+ < |
Select previous tab in Right Pane |
|
Alt+ } |
Select next tab in Left Pane |
|
Alt+ { |
Select previous tab in Left Pane |
|
Alt+ ] |
Select next tab in Editor Ribbon |
|
Alt+ [ |
Select Home tab in Editor Ribbon |
|
Alt+ H |
Select Home tab in Editor Ribbon |
|
Alt+ I |
Select Insert tab in Editor Ribbon |
|
Alt+ R |
Select Review tab in Editor Ribbon |
|
Alt+ E |
Select References tab in Editor Ribbon |
Undo and redo
Standard Undo and Redo features make text editing easier by allowing you to revert or apply edits as needed.
The Undo feature is a quick way to cancel the last change and restore the document to its
previous state. To undo the last action use either the  Undo toolbar button or the Ctrl+z shortcut on your keyboard.
The Redo feature lets you revert the last undo operation. This means that the document returns
to the state it was in before you performed the undo. To redo the last action use
either the  Redo toolbar button or the Ctrl+y shortcut on your keyboard.
Quark Author Web Edition supports many undo and redo levels, allowing you to go backward or forward as needed.
Cut, copy, and paste
Among the most common editing operations are cutting, copying, and pasting text. Quark Author Web Edition supports these operations and also allows you to paste content formatted in other applications like Microsoft Word.
To copy a text fragment, select the text and then copy it using the Ctrl+c shortcut on your keyboard. The formatting of the original text will be preserved.
To paste a text fragment, start with cutting it or copying from another source. When the text is in the clipboard, paste it using the Ctrl+v shortcut on your keyboard.
Reference note content (footnotes/endnotes) and metadata content are included when copying from one document to another in the same browser.
The Platform Adapters for Microsoft Office allow you to copy Excel content and paste that into Quark Author Web Edition. To achieve this, copy the content from Excel and paste using Ctrl+Shift+c.
Find and replace
The Find and Replace features allow you to quickly search the text looking for specific words or phrases and replace them. This allows you to rapidly change multiple occurrences of a phrase in a document instead of manually finding and modifying each one.
The Find and Replace features are implemented using one dialog box with two tabs that let you switch between
the Find and Replace features. Clicking on either the  Find or
  Replace icon on the toolbar will bring up this dialog box.
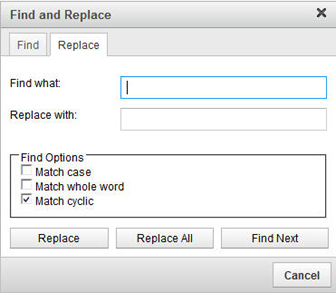
The Find tab consists of a search field and a few options that let you refine the search:
-
Match case - Check this option for a case-sensitive search.
-
Match whole word - Check this option to limit the search operation to whole words.
-
Match cyclic - Check this option to continue the search from the beginning after the editor reaches the end of the document. This option is checked by default.
The Replace tab includes the following extra fields:
-
Replace with - Enter the word or phrase that will replace the search term in the document.
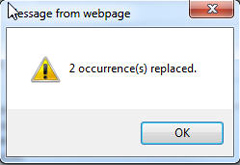
After you enter the search term as well as the replacement term and select the options, press the Replace button. If you want to replace all occurrences of the search term in the document, press the Replace All button.
The system notifies you of how many replacements were made:
XML preview
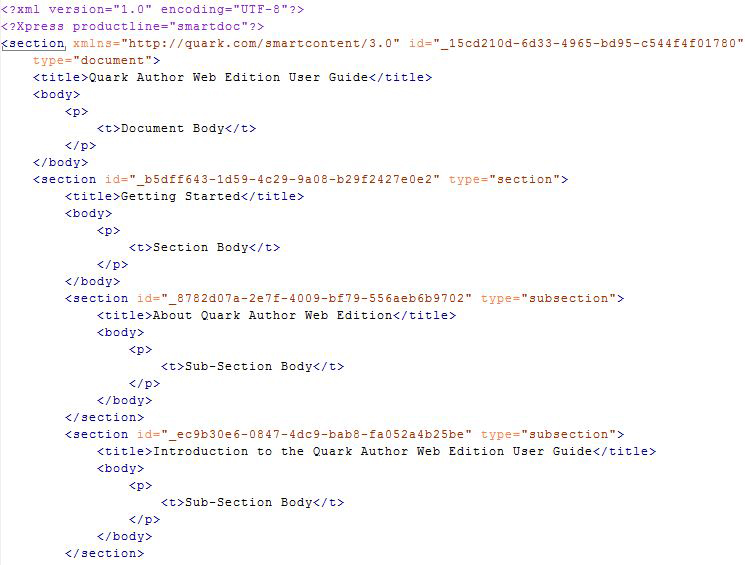
If at any time you would like to check the XML view of your document, use the  XML toolbar button to view the document in XML format. A read-only view of the text will
appear containing all the relevant XML tags and attributes:
XML toolbar button to view the document in XML format. A read-only view of the text will
appear containing all the relevant XML tags and attributes:
Saving and closing documents
Use the Save Revision button located at the header to save a revision of the document. The document will remain open for further editing.
Use the Save and Close button located at the header to check in the document.
Use the Close button located at the header to close the document. A draft version of the document will be saved.
For both the Save Revision and the Save and Close options, the Check In dialog box displays:

-
Choose a target collection from the collection list.
-
Enter a file name for the document in the File Name field.
-
To specify whether the asset is saved with a major or minor version number, click Major Version (1.0) or Minor Version (0.1)
Access to the Minor Version (0.1) option is controlled by privileges.
-
Choose a content type from the Content Type drop-down menu.
-
Choose a workflow from the Workflow drop-down menu.
-
To indicate the asset's current status, choose an option from the Status drop-down menu.
-
To send the asset to a particular user or group, choose an option from the Routed to drop-down menu.
If your workflow relies on automatic status-based routing, the Routed to drop-down menu value might change automatically when you choose an option from the Status drop-down menu.
If you do not choose any name from the Routed to drop-down menu when you check in an asset for the first time, the asset is routed to the active user.
-
Enter revision comments for the version of the asset you are checking in, in the Revision Comment field. The revision comment will be stored with the asset. The revision comment also displays when you view revisions of the asset.
-
Change values for any attribute existing on the server, which is valid for this document and shown in the Check In dialog.
-
Click Save.
Autosave
Quark Author Web Edition's Autosave feature periodically saves changes during an active editing session. By default, changes to content or structure are saved every 30 seconds. The Editor's status bar will show the Saving... and Saved states to alert you when the content is autosaved. The next time you open the document, Quark Author Web Edition automatically loads the last available autosaved version of the document.
Autosaved updates to the document are stored on the Platform Server but do not result in a new version of the document asset. Since the updated document is available on the server, a subsequent session to edit the document even from a different location or browser will automatically load the last (auto)saved content.
Autosave is also triggered when a user clicks the Close button in the header toolbar. Autosave is enabled only for documents which have been saved at least once to Platform. To avoid the risk of losing work, save the document to create an initial revision and trigger the autosave feature.
The document is saved on the Platform Server and an active connection is required to save the document.
Along with the primary document, changes to components which are checked out inline within the primary document are also saved as part of autosave. For example, a Smart Section or Smart Table contained within a checked out document may also be checked out by the same user (assuming the user has permissions). Changes to the parent document as well as the inline components are all autosaved according to the predefined interval.
Configurable interval
By default, a work-in-progress is saved every 30 seconds. The interval may be configured using the "Workspace-config.xml" file. See Quark Author Web Edition System Administration Guide for details.
Platform Server draft version
Quark Author Web Edition stores autosaved content as a draft version of the asset corresponding to the checked out document. The draft only exists on Platform server. Draft versions are exclusive to the user who has the asset checked out. Each draft is not accessible to other users nor are they used by Platform's publishing service to generate output. Autosave by Quark Author periodically updates the draft version of the document.
When updated content is saved as a new revision of document, any draft version is discarded. Draft versions of documents and hence autosaved contents are also discarded if the user aborts check out of the document or if the document's check out is overridden by another user (assuming that user has sufficient privileges).
Overriding the check-out of a document checked out by another user may cause loss of autosaved content when the draft version is discarded.
Restore last autosave
When Quark Author Web Edition performs an autosave, it attempts to validate the document structure. If edits made by a user have invalidated the document, an error message will display. The user may restore the document to the last successful auto saved draft of the document.

Offline mode
Platform allows you to access and edit checked out documents while you are disconnected from the server. When you are working on a document and you are not connected to the server, the Disconnected status can be seen in the ribbon at the bottom of the Editing pane.

Quark Author Web Edition will detect if you have made any changes to the document and will automatically save the current content as a local draft.
Not all features will be available when working with a document in offline mode:
-
If the document you are working on contains references to other documents that are not currently checked out, you will be able to view that content as read only, but you will not be able to edit the content.
-
You can insert locally store content into your document, but that content will not be automatically checked into Platform.
When you are reconnected to the server, and check out a document that you were working on offline, the local draft will be opened and you will have the opportunity to save that version to the Platform server. The status bar shows a 'Syncing' message while the offline changes are being saved to the draft of the document. The message changes to 'Sync complete' when saving is complete.
Offline mode is only supported on Chrome browsers and requires HTTPS configuration.